Many of our clients tell us the same thing – we’ve bought so much art over the years that we’ve run out of wall space. Well, if you don’t like the option of rotating art pieces on your walls (you have to have storage for the pieces that come down), salon-style may well be the answer for you. Group displays are becoming very popular these days, particularly for older people who are downsizing and younger people living in small apartments or houses. Both groups have the same problem – too little wall space. Salon-style groupings can also work great when you have the opposite problem – very large or odd-sized walls.
The term “Salon-style” actually comes from 18th century Paris. The Academy of Artists held an annual show for their members. Entries were judged but large numbers of pieces were deemed worthy of display. Salon meant a gathering under one roof or in one room and was typically associated with artistic or literary gatherings. If you find an old picture of the annual show the Academy held, you’ll see a very large room with a very high ceiling and the walls are absolutely covered in art. They would put the smaller pieces at the bottom and work up in size with the largest pieces being at the top of the wall.
As Impressionism gained popularity things came to a head when the “stodgy” Academy judges repeatedly rejected these types of paintings from the annual show. The artists rebelled and started a show called the Salon des Refuses – the show for the judges rejects. I think this show was open to any artist who paid a fee. A third annual show (Salon d’Automne) was added later. This was also a judged show but used judges who were more open to “modern” art. Anyway, Salon-style was well established by the 18th Century and has had periods of popularity ever since.
When one picture isn’t going to work, for whatever reason, you can group images together for a more cohesive display. You don’t have to decide which piece goes on the wall – put them all up! It’s easy to create a grouping that is completely unique to you, your style and your home. The good news is there are no real rules to Salon-style, and lots of different ways to achieve an interesting grouping.
Symmetrical or Asymmetrical? Good news – both work, depending on the look you’re trying to achieve.

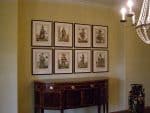
A symmetrical layout is even and organized, creating a formal, structured arrangement. Symmetrical layouts tend to be grid-based, with equal sizes and consistent framing styles. Images may either line up horizontally, vertically or both based on the number of pieces, shape of individual pieces and overall size.

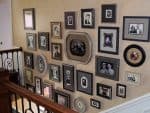
An asymmetrical layout is more casual, using different sizes, styles, and colors to create a eclectic feel. It takes a little more planning to ensure that this kind of grouping does not feel chaotic or random, but the overall effect can be very creative. This is one time when ‘different’ works together.
When creating the grouping layout for the wall, there needs to be a sense of balance. A general rule is to begin in the center and work outward, making sure that the larger pieces always have a counter balance. It’s fine to mix vertical and horizontal pieces. For symmetrical layouts, measure your available space to make sure your pieces are properly centered. If you have an uneven space to fill (like by a staircase), keep the heaviest piece to the bottom as your eye naturally goes from bottom left to top right. If your asymmetrical arrangement is in a normal sized space, the heaviest piece should be placed in the center. Whichever format you choose a 2 or 3 inch spacing between frames is a good rule of thumb. Be consistent if you choose 3 inches then every gap between frames should be 3 inches.

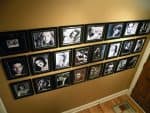
When deciding placement on the wall, be creative. These black & white glossy pictures of movie stars in a home theater are framed and arranged so that the effect resembles a film strip.
Hanging The Grouping
The most important thing is to plan it. Having a set plan of how the grouping will hang will save you a wall full of nail holes!
 Spacing between each piece should be proportional to the overall size you have available. If pieces are placed too close it will make the art look crowded; too far apart will make it feel disconnected. Varying spacing can seem chaotic and random. Correct spacing sometimes depends on the amount of room you can devote to the grouping.
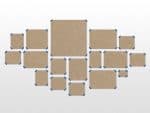
After the images are framed, make a template of each piece to be hung. Trace around the outside of the frame on kraft paper, cut out the shape, and label it. Note on the paper whether the art is vertical or horizontal. You may also want to note which picture it is. Secure the templates to the wall with painter’s tape. Stand back and look at the arrangement. Do you like it? Or do you need to rearrange? Once you have decided on a plan, leave them up there until the pieces are actually hung.
You can start anywhere you want but it’s best to start at one end and work toward the other. Measure where the wall hook(s) need to be to have the art hang exactly over the kraft paper and start the nails but don’t knock them in all the way. Then you can pull the piece of kraft paper off the wall, hammer in the nails the rest of the way, hang the correct piece of art and move onto the next.
Frame A Collection
 Framing is a great way to enjoy a collection of images. If the images are linked items, a series, or visually similar, consistency is the key to making this grouping feel like a collection. The images in our example are the same coloring, so it is easy to frame them all with the same matting and moulding. Consistent design emphasizes that the grouping belongs together and brings focus to the art.
Unite Your Art
 Your grouping should be united in some manner. It can be by image style, image subject, size, frame moulding, or by mat color. Think about why are you combining these particular images. Use the design to reinforce your reason.
You can use a mix of frame styles (ornate, traditional, modern), but make all the frames the same color. Or use a completely different frame style for each image, but all the images are the same subject. Or even use the same size image, matting color and frame.
Filling An Odd Sized Space

An extremely long or tall wall can be intimidating to fill. For a wide horizontal space, consider multiple pieces hung side by side. Buy a panoramic print, cut it into three pieces, and frame each piece individually but in the same style.

For a tall vertical space, consider stacking multiple pieces in a column. Buy three of the same print and rotate each so that the grouping looks like one piece. Because wall groupings are so flexible in their layout, it’s easy to customize for an odd sized space.
Remember one thing – a large number of framed pieces is a large surface area of glass and, typically, the larger the surface area the greater the reflection. Museum glass is a great choice because of it’s glare/refection reduction.
If you’re not familiar with us or our work, we invite you to take a look around our website or, even better, come in and talk to us about your textile framing project and we can walk you through the process and offer design tips.
Take a look at some of our recent work on our portfolio page
If you’d like to get some ideas for framing multiple pieces of art for a salon-style display, come in and talk to us. Even if you’re starting the wall with a few pieces and we can help you with some design ideas that will make it easier to add more pieces in the future and still keep a “cohesive” look.
If you’d prefer to make an appointment, please call us at 303-394-3362 to set up an appointment to come in and talk to one of our designers for a free design session/discussion. Alternatively, send us an email below with some details of what you’re looking for and we’ll get back to you as quickly as we can.
Framed photos symmetrical display
Email us
